The Smart Mailbox IoT project uses the PIR motion sesnor. Using this tutorial, you will be able to plug and code the sensor to the Raspberry Pi.
PIR Motion sensor information
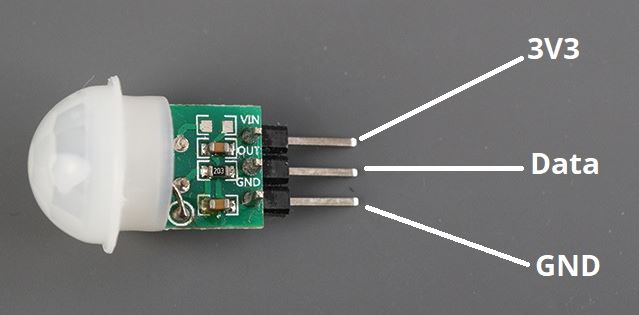
A PIR motion sensor detects changes in infrared light in its field of view. This makes it ideal for detecting humans or animals because it will pick up living things (or heat-emitting objects) that move within its range but not inanimate objects.
You can program the Pi to react to changes in infrared light by triggering an event such as turning on a light, sounding an alarm, sending a notification, or, simply printing a message in the shell.
The PIR motion sensor outputs a HIGH signal on the Data pin when it detects movement, or a LOW signal if it doesn’t.
As shown in Figure below, it has three pins: VCC, GND, and Data:
To use the PIR sensor, you have to “plug” it to a Raspberry Pi via the GPIOs (General Purpose Input/Output Pins) or Pinout.
Understanding the Raspberry Pi Pinout
The Raspberry Pi 4 Model B and most recent versions of the Raspberry Pi have a General Purpose Input/Output Pins (GPIOs) that allow you to connect electronic components like LEDs and sensors. Some pins have specific functions like providing power, I2C, SPI, and UART communication protocols or PWM. We’ll take a look at the Raspberry Pi GPIOs and their functions.
As show the figure below, the Raspberry Pi 4 Model B board has a double row of 40 GPIO pins. This layout is the same for the Pi 3 Model B and B+, Pi 2 Model B and B+, and Pi 1 Model B+, but slightly different from the Pi 1 Model A and B, which only have the first 26 pins.
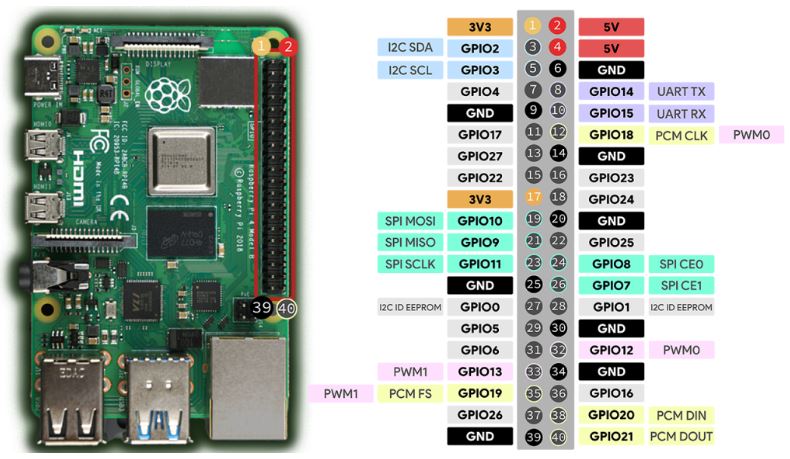
There are several ways to refer to a GPIO pin: its name (which is known as GPIO numbering or Broadcom numbering) or its corresponding pin physical number (which corresponds to the pin’s physical location on the header). For example, GPIO 18 corresponds to pin 12.
You can explore more options regarding the RPi Pinout using the Raspberry Pi Pinout Guide.
Wiring a PIR Motion Sensor to the Raspberry Pi
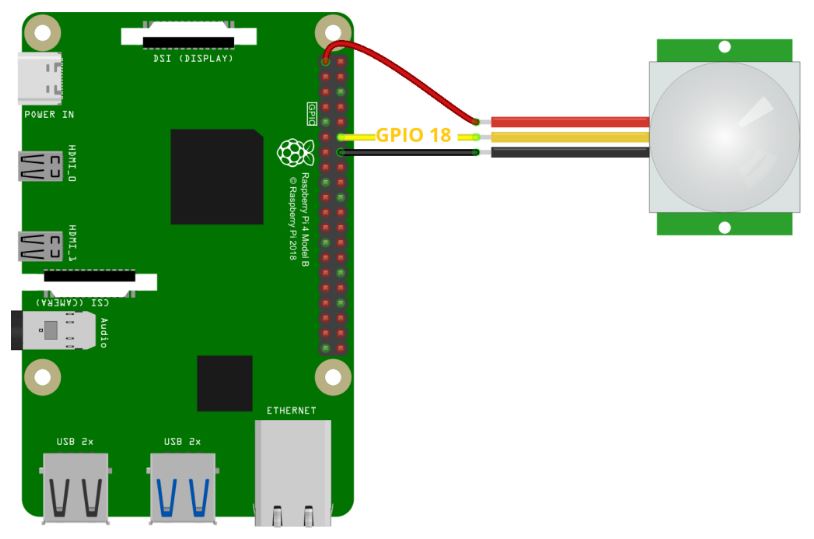
As already mentioned, the PIR motion sensor has three pins: VCC, GND, and Data. Using the components provided (RPi Board, PIR Sensor, Breadboard, Jumper Wires), you should connect VCC to the 3V3 pin, GND to a GND pin, and the Data pin to a suitable Raspberry Pi GPIO (we’ll connect it to GPIO 18, see Figure below).
Code PIR Motion Sensor using gpiozero
After wiring the PIR motion sensor to the Raspberry Pi GPIOs, we can write a Python script to detect the state of the sensor, and thus check whether motion is detected or not.
To write that script, we’ll use the gpiozero library. The gpiozero library provides a collection of interfaces for everyday components like LEDs, buttons, potentiometers, sensors, and much more.
It provides an interface called MotionSensor, designed especially for motion sensors. It comes with several properties and functions that are useful to use with this kind of sensor.
The gpiozero library should already be installed if you’re running Raspberry Pi OS.
Detect Motion – Python Script
The following script prints a different message in the shell depending on whether the sensor is detecting motion or not.
Create a new Python file called motion-sensor.py and copy the following code.
from gpiozero import MotionSensor
from signal import pause

pir = MotionSensor(18)

def motion_function():
    print("Motion Detected")

def no_motion_function():
    print("Motion stopped")

pir.when_motion = motion_function
pir.when_no_motion = no_motion_function

pause()
To discover how the code works, as well as explore more information related to this guide, you can use the following tutorial Detect Motion using a PIR Sensor with Python.